為 Mutt 加上側邊欄
去年因為某 YouTuber 的慫恿,我便開始學習在 VPS 上自架郵件伺服器,並用自己的域名來收信。
從以前就一直在用的 Gmail 信箱雖然沒有停用,不過目前我在網路上新註冊的服務都是使用[email protected]格式的信箱來收發信件。
身為 tig 的重度用戶,在終端中用鍵盤操作一行行 record 已經成為習慣了。當初就想:「不如收發信件也比照辦理吧!」。 透過 IMAP 協定,在 PC 上我通常使用 Mutt 這個 TUI 軟體來收發信件。 雖然整個流程建立好了,但 Mutt 的預設介面始終沒有像網頁版的 Gmail 一樣稱手。 導致收信時一直都覺很麻煩,連帶影響打開它收信的意願。
前幾天想想不能再這樣下去了,於是開始翻找手冊改進 muttrc 。
讀了一會後,才想到原來是少了側邊欄啊! 難怪在切換不同郵箱時都覺得非常不便利。
開始抄作業
使用 Arch Linux 預設的 pacman 安裝 Mutt 後,有關側邊欄的設定建議可以在
/usr/share/doc/mutt/samples/sample.muttrc-sidebar 中找到。
有了這份指引,要弄出一份堪用的設定就簡單多啦!
經過一番摸索,我的 muttrc 裡面,有關側邊欄的設定如下:
# 打開sidebar
set sidebar_visible = yes

# 選定要追蹤的郵箱,'+'號開頭的字串就被用作分隔線啦
mailboxes =INBOX =mbox "+---------- Watch ----------" =pay =osm =keep "+-------- Processed --------" =Sent =Trash =Drafts

# 讓Mutt取得未讀郵件和總郵件數量
set mail_check_stats

# 郵箱的顯示格式,直接照抄sample文件即可
set sidebar_format = '%B%?F? [%F]?%* %?N?%N/?%S'
set sidebar_short_path = yes

# 綁定快捷鍵,用來切換側邊欄顯示,並選擇郵箱
bind index,pager B sidebar-toggle-visible
bind index,pager \Cp sidebar-prev
bind index,pager \Cn sidebar-next
bind index,pager \Co sidebar-open
bind index,pager <F5> sidebar-prev-new
bind index,pager <F6> sidebar-next-new

# 其它顏色設定
color indicator cyan black
color sidebar_highlight white color8
color sidebar_divider color8 black
color sidebar_flagged red black
color sidebar_new green black
成果如下:
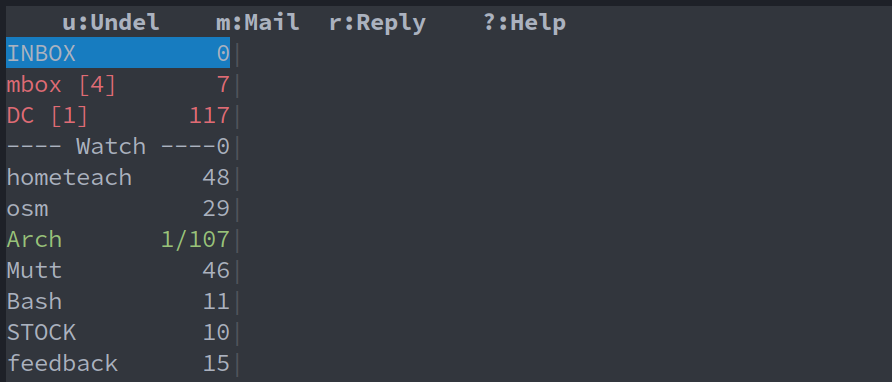
可以看到,若郵箱中含有 important 這類 flag 的郵件,在側邊欄中還會順道標示數量,實用度大增。
接下來嘛,就是養成在 Mutt 收發郵件的習慣。
一邊使用一邊讀手冊,慢慢把 muttrc 改進囉!
我的整份 muttrc 放在 Github ,
其中還修改了不少預設的快捷鍵以配合我過去使用 Gmail 的習慣。